
We need to look at the wiring options for fitting the our Solar Panels, they can be wired in multiple ways, each with it advantages and dis-advantages. With our current plan for a two large 415W panels we have two main options we can wire them in Series or in Parallel. If we fit more smaller 200W panels to get to our 800W target we can also use a hybrid wiring option.
Panels in Series or Serial Wiring
In the example below I have wired the panels in series so that the output of one panel goes to the input of the next panel.
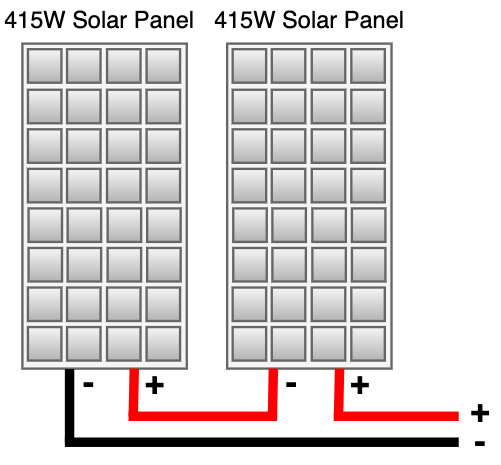
In this example each panels can output up to 38.9 Volts and 10.62 Amps, by putting them in series we combine the voltages (2 X 38.9 = 77.8V), but the Amps will stay the same at 10.62A.
Giving an output of 826 Watts (77.8 Volts X 10.62 Amps = 826.23 Watts).
The main advantage of wiring in series is that we get a higher voltage, this enables us to use a thinner mm2 wire, while carrying the same amount of power (Watts) and also a lower voltage drop in the cable.
In our boat in this configuration with an expected cable run of 12m using our voltage drop calculator we could just use 2.5mm2 cable and still keep the Voltage drop below the 2% target. ( I suspect we would use the 4mm2 as this would give us a larger safety margin at little additional cost).
Also we find the both MPPT and PWM solar controllers are much cheaper if we use a higher voltage/lower amperage versions.
One potential disadvantage is that wired this way the two panels act as one larger panel, so if one is in the shade it will effect the total output of both panels.
Parallel Wiring the panels
In this example below I have wired the panels in parallel so that the positives are connected together as are the negative on each panel.
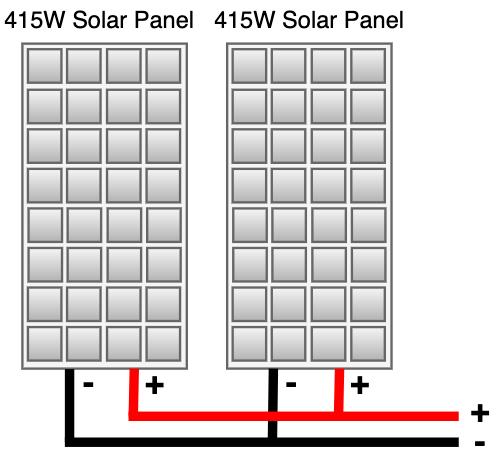
Again in this example these panels can output up to 38.9 Volts and 10.62 Amps, by putting them in parallel we combine the current in Amps (2 X 10.62A = 21.24A), but the Voltage stay the same at 38.9V.
Giving an output of 826 Watts (21.24 Amps X 38.9 Volts = 826.23 Watts).
In our boat in this configuration with an expected cable run of 12m using our voltage drop calculator we would need to fit a 10mm2 cable to keep the Voltage drop below the 2% requirement (This could add significant extra cost in cable and fittings).
Hybrid Serial & Parallel Configurations.
In this example we have wired 4 X 200W panels so that they connect is pairs in serial and the two pairs are connected in parallel.
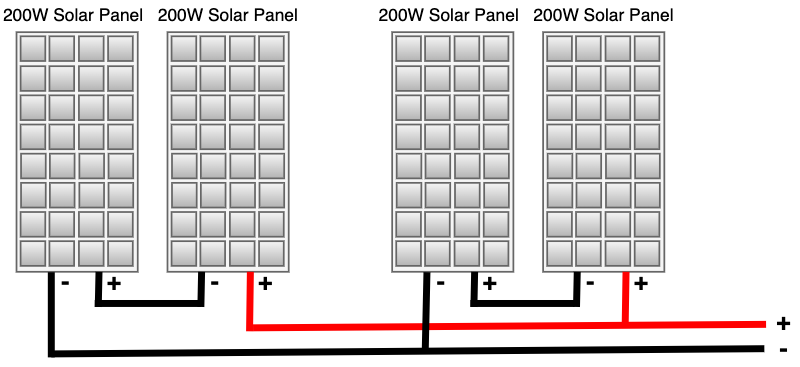
So in this example each of these 200W panels can output up to 19.2 Volts and 10.42 Amps, by putting them together in pairs in series and then the two pairs in parallel the calculation is as follows.
We combine the two serial panels together so that we double the voltage of the pair of panels 2 X 19.2V = 38.4V while the Amps stays the same at 10.42 Amp.
Combine both sets of panels together in parallel and the Amps doubles 2 X 10.42 Amps = 20.84 Amps at 38.4V
Therefore 20.84 Amps X 38.4V = 800.25 Watts
In our boat in this configuration with an expected cable run of 12m using our voltage drop calculator we would need to fit a 10mm2 cable to keep the Voltage drop below the 2% requirement.
Things to remember
- Solar panels wired in series adds there Voltages together.
- Solar panels wired in parallel adds there Amps together.
Note: the circuit diagrams where drawn using Draw.io
Also see
Planning for Solar Panels – Part 1
Planning for Solar Panels Part 2 – Panel Mounting Options
Planning for Solar Panels Part 3 – Types of Panels
Planning for Solar Panels Part 4 – MPPT vs PWM solar controllers
Planning for Solar Panels part 5 – Cable sizes, lengths and resistance.
Planning for Solar Panels part 6 – Panels in Serial or Parallel
Planning for Solar Panels part 7 – Buying the cable and Circuit breakers
Planning for Solar Panels part 8 – Buying Solar Panels and Mountings
Planning for Solar Panels part 9 – Wiring
Planning for Solar Panels part 10 – Drilling, Tapping and Fitting
3 Replies to “Planning for Solar Panels part 6 – Panels in Serial or Parallel”
Comments are closed.